Deprecated - Alas, this project is only available for historical purposes. Apple has removed the UI Testing instrument that used JavaScript to drive the user interface of apps. There's a new suite of user interface testing tools, but it doesn't use JavaScript so the UI AutoMonkey won't work with it.

UI AutoMonkey is a simple to set up stress testing tool for iOS applications. You can pound on your app until it wilts with a barrage of taps, swipes, device rotations, and even locking and unlocking the home screen! Watch the app's performance characteristics with Instruments, discover race conditions, or just enjoy watching your work under butt dialing conditions.
There's nothing special to install since this leverages UI Automation and Instruments that come with Apple's developer tools. If you have Xcode, you've got all you need to stress test your applications with UI AutoMonkey. Follow the instructions below to set up a UI Automation Instruments template with the UIAutoMonkey.js script.
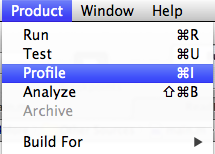
First, load up your app in Xcode. Choose "Profile" from the "Product" menu (or press Command-I) to build your application and launch the Instruments template picker.
Next, you'll want to pick the "UI Automation" template. You can add in other instruments to measure the app's performance under the test after we set up the basic automation template.
Switch to the script pane by choosing "Script" from the dropdown menu in the middle dividing bar of the Instruments document.

Create a script in this Instruments document by choosing "Create..." from the "Add" button on the left sidebar.

Paste in the UIAutoMonkey.js script. Feel free to adjust the configuration parameters to taste. You'll find more discussion about them below.
At this point you can simply click the playback button at the bottom of the Instruments window to start the script. Boom. The monkey lives.
Once you've set up UI AutoMonkey in your Instruments document, you can create a custom template tied to this application that you can double click to run. First, make sure the Instruments document is stopped by clicking the red record button in the upper left of the Instruments document. Then choose "Save As Template..." from the "File" menu and choose where to put the file. Now, you can double click this template to open Instruments with the UI AutoMonkey script already embedded. Just click the red record button in the upper left of the Instruments document and the app will launch and run.
For simplicity's sake, the tool is just a single script you paste into a UI Automation template for your application. You could wire it up in a command line workflow if you want, but that would take a bit more effort than you need to just get it running.
At the top of the script, you'll see a JavaScript dictionary of configuration settings:
config: {
  numberOfEvents: 1000,
  delayBetweenEvents: 0.05,    // In seconds

  // Events are triggered based on the relative weights here.
  // The event with this highest number gets triggered the most.
  eventWeights: {
    tap: 30,
    drag: 1,
    flick: 1,
    orientation: 1,
    clickVolumeUp: 1,
    clickVolumeDown: 1,
    lock: 1,
    pinchClose: 10,
    pinchOpen: 10,
    shake: 1
  },

  // Probability that touch events will have these different properties
  touchProbability: {
    multipleTaps: 0.05,
    multipleTouches: 0.05,
    longPress: 0.05
  }
},
numberOfEvents is pretty straightforward. It's how many events will happen to your application.
delayBetweenEvents controls how many seconds (or fractions of seconds) the script waits before triggering the next random event. You might want to tweak this to taste. The script triggers events directly on the UIATarget so there is no natural timeout that you might be familiar with when interacting with UIAElements. The script will pummel the app with events as fast as it can generate them if you want it to.
eventWeights are relative weights to determine how often an event gets triggered. If the tap event is 100, and orientation is 1, then a tap is 100 times more likely to occur than a device orientation. Adjust these to match the best set of events for your application.
touchProbability controls the different kinds of tap events. By default, a tap is just a single tap. Adjust these settings to set how often a double tap or long press occurs. Each of these values must be between 0 and 1.
Running on device, the script may fail with a vague message: "An error occurred while trying to run the script." Make sure that under the Developer menu in device settings, the "Enable UI Automation" option is toggled on.
As delivered the monkey starts itself. If you import it, it will start running immediately, which is probably not what you want if you want to customize its use. If you want to control when the monkey is released please follow the pattern in the SampleCustomization folder. In brief you want to set a global as set in SetGlobals.js, but due to Apple's javascript implementation you cannot simply set it beofre you import UIAutoMonkey.js. Instead you need to follow the pattern in the SampleCustomization folder.
Save UIAutoMonkey.js somewhere in your disk to import it and configure it in each of your Instruments instances
"use strict";
#import "Includes.js"


// Usage & Customization example

// Configure the monkey: use the default configuration but a bit tweaked
monkey = new UIAutoMonkey();
monkey.config.numberOfEvents = 1000;
monkey.config.screenshotInterval = 5;
// Of course, you can also override the default config completely with your own, using `monkey.config = { … }` instead

// Configure some custom events if needed
monkey.config.eventWeights.customEvent1 = 300;
monkey.allEvents.customEvent1 = function() { … }

// Release the monkey!
monkey.RELEASE_THE_MONKEY();
###Includes.js Setup a single includes file. Due to Apple javascript limitations it is best to have all of your imports there. E.G
#import "SetGlobals.js"
#import "/path/to/buttonHandler.js"
#import "/path/to/UIAutoMonkey.js"
You will need to adjust the imports to the path for UIAutoMonkey.js and the optional buttonHandler.js files
###SetGlobals.js Have at least this global there:
UIAutoMonkeyClientWillReleaseTheMonkey = true;
When the monkey is released using the default release mechanism (UIAutoMonkeyClientWillReleaseTheMonkey is undefined or false) it executes
UIALogger.logDebug("Releasing the monkey directly from UIAutoMonkey");
and you will see this in the trace log. If your customization are not taking effect make sure that the entry "Release the monkey directly from UIAutoMonkey" is not in the trace log.
Check out the built in events for more information and the helper methods available to you.
(Special thanks to Oliver Halligon for the new customization features!)
After enjoying your monkey for a while you may notice some situations that require some intervention.
If you run your monkey for a specific number of events it's not clear just how long it will run for. Each event might take a little while to process. If you run for a long time the imprecision adds up.
monkey.config.minutesToRun = 60 * 8; //run for 8 hours
monkey.config.checkTimeEvery = 60; //check the time every 60 events. (optional and defaults to 60)
monkey.config.numberOfEvents = false; // turn off to make clear that we want minutes
The above will run the monkey for ~8 hours. Every 60 events it will check the time (for efficiency it doesn't check every event). To avoid ambiguity if you want to run in minutes you must turn off monkey.config.numberOfEvents by setting it to 0 or false.
At times your playful monkey will enter a page from which it rarely escapes. Perhaps the only way out is a little "X" button on the top right, and until that is pressed the monkey will remain on the page. This may prevent your monkey from fully visiting your application. Wouldn't it be nice to tell the monkey "Check every so often and if there's an "X" button press it"?
The monkey has a notion of condition handlers. The monkey is not too smart, but condition handlers let you add clever behavior.
var handlers = [ ];
handlers.push(new ButtonHandler("Back", 10, true));
...
monkey.config.conditionHandlers = handlers;
This instructs the monkey that every 10 events it will check to see if there is a visible Back button on the navigation bar, and if so press it.
You can add as many handlers as you want. ButtonHander is just a specific type of handler that is ready to rumble with the Monkey, but you can add other types of handlers as long as they conform to the conditionHandler protocol defined in UIAutoMonkey.
Now the conditionHandlers are processed right in the monkey's inner loop, so it is usually prudent to not check the handlers on every single event. That would be inefficient, and furthermore you don't want to jump out of UI Holes immediately: we want to linger for a while. The second parameter is how often (in event units) to check if the buttonHander's condition isTrue(). The 3rd parm is true if the button descends from the navigation bar, or false if it is a top level button.
If you need more advanced detection you can add an optional 4th parameter, the optionalIsTrueFunction. This can be used for more advanced detection if the condition is true.
ConditionHandlers (remember, a ButtonHandler is a type of conditionHandler) have an isExclusive() method. If true, and if the condition is true, then no other conditions are considered for the current pass. ButtonHandlers always return true for isExclusive().
For example:
var handlers = [ ];
handlers.push(new ButtonHandler("Back", 10, true));
handlers.push(new ButtonHandler("Done", 10, true));
...
monkey.config.conditionHandlers = handlers;
On pass 9 through the monkey neither handler will be considered beause 9 is not a multiple of 10.
One pass 10 through the monkey lets assume that there is a "Back" button visible on the navigation bar. The monkey will invoke the first buttonHandler, it will indicate that it finds a button. The monkey will ask the handler to handle() the condition, and finally it will ask the handler if it isExclusive() to which it will return true. The monkey will then skip any other handlers for event 10, so it will not invoke the Done buttonHandler.
For efficiency the most popular exclusive handlers should be placed first. At the end of the monkey run statistics are logged that indicate how often each handler returned true.
Sometimes your application may stop responding, but our playful monkey doesn't care. Hours can pass while the monkey thinks it's tapping, dragging etc... when in reality the application is frozen.
This becomes worse when our monkey is connected to an unattended continuous integration server. The monkey run may finish and erroneously report success. What's need is some way to detect ANR condtions and fail the monkey.
The monkey can check to see if the application is progressing. It does this by using a fingerprintFunction to document the state of the application. If the state of the application fails to change the monkey can declare an ANR.
The fingerprint function is supplied by the client. One handy, free fingerprint function is elementAccessorDump() found in the open source Tuneup.js. This function creates a logical textual description of the main view.
//ANR handling
#import ./tuneup.js
...
var aFingerprintFunction = function() {
    var mainWindow = UIATarget.localTarget().frontMostApp().mainWindow();
    //if an error occurs log it and make it the fingerprint
    try {
        var aString = mainWindow.elementAccessorDump("tree", true);
        if (monkey.config.anrSettings.debug) {
            UIALogger.logDebug("fingerprintFunction tree=" + aString);
        }
    }
    catch (e) {
        aString = "fingerprintFunction error:" + e;
        UIALogger.logWarning(aString);
    }
    return aString;
};
monkey.config.anrSettings.fingerprintFunction = aFingerprintFunction;
monkey.config.anrSettings.eventsBeforeANRDeclared = 1800; //throw exception if the fingerprint hasn't changed within this number of events
monkey.config.anrSettings.eventsBetweenSnapshots = 180; //how often (in events) to take a snapshot using the fingerprintFunction
monkey.config.anrSettings.debug = true;  //log extra info on ANR state changes
The above will take a current snapshot every 180 events using the fingerprintFunction. If it is the same as the prior snapshot and if that's been the case for more than 1800 events, then an exception will be thrown and the monkey will stop. Otherwise the current snapshot will become the prior snapshot.
At the end of the run statistics are logged indicating the max number of events that the snapshot was identical, and what the monkey.config.anrSettings.eventsBeforeANRDeclared was. You can use this to see how close the system was to throwing an ANR exception.
To make the most out of this, you'll want to level up on Instruments, Apple's official tool for evaluating usage and performance of your applications. Check out session 409 from the WWDC 2012 sessions (included for free with an Apple developer account), for more information.
To learn more about UI Automation, check out my collection of resources on cocoamanifest.net.
Feel free to fork the project and submit a pull request. If you have any good ideas to make this easier to set up for new users, that would be great! I'm also looking for a good avatar to represent our fine monkey. Got some graphic skills?
Jonathan Penn
- http://cocoamanifest.net
- http://github.com/jonathanpenn
- http://alpha.app.net/jonathanpenn
- http://twitter.com/jonathanpenn
- jonathan@cocoamanifest.net
UIAutoMonkey is available under the MIT license. See the LICENSE file for more info.